Ubuntu (Studio) doinstalace (19.04)
Nastavení systému → Vzhled →
- Pro Ubuntu
– tapeta, velikost launcheru
– chování: jednoklik, koš, spustitelné soubory,
– tlačítka oken vlevo (xfce4-settings-manager – Správce oken)
– povolit pracovní plochy
– uživatel v liště a čas - Nastavení systému →Software a aktualizace –
-zdroje software na hlavní server
– zapnout partnery Canonicalu
– dodatečné ovladače - Nastavení systému → Jazyková podpora
—
- gnome-terminal
vypnout klávesové zkratky
upravit barevný profil apt-get update && apt-get upgrade -y
+ doinstalovat dodatečné ovladače
- apt-get install -y gedit synaptic numlockx gdebi atop rdesktop filezilla winetricks gkrellm mc gnome-tweak-tool ubuntu-restricted-extras nautilus-dropbox compizconfig-settings-manager cairo-dock ssh audacious audacity gparted qbittorrent playonlinux cups-pdf k3b xsane inkscape gnome-system-tools nautilus-image-converter preload bleachbit zram-config chromium-browser flashplugin-installer gimp kde-l10n-cs xfonts-biznet-100dpi xfonts-biznet-75dpi xfonts-biznet-base krusader meld kget arj vlc unace gpodder kdiff3 krename lhasa rar rpm kate gnome-terminal plank gnome-disk-utility virtualbox virtualbox-ext-pack unity-tweak-tool handbrake handbrake-cli kompare bluez-hcidump
(docky pro tuto verzi není k dispozici) - Další desktopová prostředí
apt-get install gnome-shell plasma-desktop ubuntu-unity-desktop cinnamon-desktop-environmentsudo apt-get install --no-install-recommends ubuntu-mate-core ubuntu-mate-desktop
- Doplňková nastavení:
– Nastavit klávesové zkratky, interní editor a vlastní ministatus v mc.
– Zadat uživatele a upravit (gnome-system-tools) práva.
– Vypnout otravné hlášky:sudo -i gedit /etc/default/apportObsah souboru pak vypadá takto:
# set this to 0 to disable apport, or to 1 to enable it
# you can temporarily override this with
# sudo service apport start force_start=1
enabled=0 - PostgreSQL (pokud potřebujeme jinou verzi)
sudo apt-get install curl ca-certificates
curl https://www.postgresql.org/media/keys/ACCC4CF8.asc | sudo apt-key add -
sudo sh -c 'echo "deb http://apt.postgresql.org/pub/repos/apt/ $(lsb_release -cs)-pgdg main" > /etc/apt/sources.list.d/pgdg.list'
sudo apt-get update
sudo apt-get install postgresql-11 pgadmin4
- Doplňkové aplikace: (Mega, Dropbox, virtualbox, flexibee, electrum, exodus … podle preferencí uživtele)
—
– Dash to Dock (pro Ubuntu)
sudo apt-get install chrome-gnome-shell
—
Dash to Dock v63 will be available to upgrade/install via the GNOME Extensions website at some point in the coming weeks (the update is currently pending review).Dash to Dock on GNOME Extensions
If you’re impatient you can download the latest release from Github, though be aware that you’ll need to install the extension manually by extracting the .zip and placing the relevant folder in the ~/.local/share/gnome-shell/extensions folder.
— - enable zswap
you need to edit /etc/default/grub
edit line toGRUB_CMDLINE_LINUX=“zswap.enabled=1″and run
update-grubto generate boot configure for grub
after done all of these, reboot your system, happy time.- - OpenDNS ip address:
208.67.222.222
208.67.220.220
— - Úprava velikosti swapu (volitelně)To permanently change this value:
gksudo gedit /etc/sysctl.conf
Search for vm.swappiness and change its value as desired. If vm.swappiness does not exist, add it to the end of the file like so:
vm.swappiness=10
Finally, save the file and reboot Disable Guest Session (volitelně)
If you would like to remove the ability for a Guest to log onto your computer, simply run this command:
sudo /usr/lib/lightdm/lightdm-set-defaults –allow-guest false
To revert this simply run the command again with true at the end instead of false.
iFuse (iPod, iPhone Libraries)
Note: This was tested in 11.10 and not 12.04. Try this at your own risk, and please e-mail me your results.
Okay, admittedly I’m not an iDevice user, and never will be. But from what I’ve looked into this is the proper way to get music programs like Rhythmbox to recognize your iDevice. If you have any useful information on this topic please email me at rowan [at] mindseeder [dot] com.
sudo apt-get install ifuse libimobiledevice-utils
idevicepair unpair && idevicepair pairNote: If you’re getting a -5 Error, try this:
sudo apt-get install libimobiledevice4-dbg libimobiledevice-dev
idevicepair unpair && idevicepair pair- Kalkulačka v Dashi
sudo add-apt-repository ppa:scopes-packagers/ppa sudo apt-get update sudo apt-get install unity-lens-utilities unity-scope-calculator
–
DOPLŇĚNÍ - Úklid Firefoxu
http://askubuntu.com/questions/389026/what-trusted-file-cleaning-tools-are-available-for-ubuntu
http://petrkrcmar.blog.root.cz/2009/07/12/jak-vycistit-databaze-a-urychlit-si-firefox/Pokud se nechcete zabývat detaily nebo neumíte anglicky, tady je celý postup zjednodušeně:0) vypněte Firefox – budete se mu hrabat v databázi
1) Nainstalujte balíček sqlite3, určitě bude ve vaší distribuci.
2) Navštivte adresář s profilem. Bude ve vašem domovském adresáři v .mozilla/firefox. Ještě musíte do podadresáře s krkolomným automaticky generovaným názvem.
3) Spusťte v něm následující příkaz:for z in *.sqlite; do echo „VACUUM;“ | sqlite3 „$z“; doneOperace bude trvat několik desítek sekund. Moje databáze (dohromady všechny soubory s příponou .sqlite) se po akci smrskly z 81 na 60 MB.Výrazně se tím zrychlil start Firefoxu a navíc jsou hned dostupné všechny informace, jako třeba historie.
Dříve bylo potřeba po rozklepnutí menu pár sekund počkat, než se vše načte z disku do paměti a utřídí.
Pak teprve se informace objevily. Teď je vše připraveno okamžitě po načtení. - Přizpůsobení Unity:
http://www.root.cz/clanky/jak-si-prizpusobit-unity-aby-se-dalo-pouzivat/ Automatic brightness control
If you want to change the brightness on ac-adaper plug-on/off, add the following in /etc/acpi/handler.sh:
ac_adapter) case "$2" in AC|ACAD|ADP0|ACPI0003:00) case "$4" in 00000000) logger 'AC unpluged' echo "20" > /sys/class/backlight/acpi_video0/brightness ;; 00000001) logger 'AC pluged' echo "50" > /sys/class/backlight/acpi_video0/brightness ;; esac ;;
Power consumption
With cpupower, laptop-mode-toolsAUR and acpid installed and graphics switched to intel gpu, I get over 9 hours battery life.
apt-get install linux-tools-common
 sudo apt-get install indicator-cpufreq
Fingerprint scanner
Buď toto (a nebo raději GUI):
To get that working you need fprintd and libfprint-vfs5011-gitAUR. Follow the Fprint guide for the rest.
– Add this PPA to your sources:
sudo add-apt-repository ppa:fingerprint/fprint
sudo apt-get update
sudo apt-get upgrade– Install the software:
sudo apt-get install libfprint0 fprint-demo libpam-fprintd gksu-polkit(Note: If you have experimented with fingerprint authentication before and have changed your /etc/pam.
d/common- auth, you may be presented with a screen asking whether you want to override those changes. Select Yes. Under very special circumstances, you may get an error saying
pam-auth-update: Local modifications to /etc/pam.d/common- *, not updating.
pam-auth-update: Run pam-auth-update –force to override.
In this case, run “sudo pam-auth-update –force”, exactly as suggested, and enable the fprintd profile manually. Leave the standard system profiles (Unix, Keyring and ConsoleKit) enabled as well.)– Launch “fprint project demo” and check that you can enroll and verify your fingerprints and that your reader is indeed supported.
– Run “fprintd-enroll” in terminal to save your fingerprint.
That’s all! Test it: Lock and unlock screen, log out and back in, try sudo in terminal.
https://launchpad.net/~fingerprint/+archive/ubuntu/fprint
Fingerprint GUI:
sudo add-apt-repository ppa:fingerprint
/fingerprint- gui
sudo apt-get updateInstall the packages:
sudo apt-get install libbsapi policykit-
1-fingerprint- gui fingerprint-gui Log out of your session and log back in (we need the new session defaults to be picked up).
Setup
=====
After installation launch “Fingerprint GUI” and enrol your fingerprints.
That should be all you need to do!
Try locking your screen, logging out and in, sudo in terminal and running graphical apps requiring root privileges.https://launchpad.net/~fingerprint/+archive/ubuntu/fingerprint-gui
—Zrušení hesla implicitní klíčenky:
Zrušení zadávání hesla
 Tímto krokem snižujete bezpečnost svého systému
Při používání aplikací, které ukládají hesla do klíčenky, je potřeba vždy zadat heslo. Tomu se dá zabránit následujícím postupem:
- V záložce Hesla změňte heslo u položky login

- Vyplňte Staré heslo a políčka Heslo a Potvrďte heslo nechte prázdná.
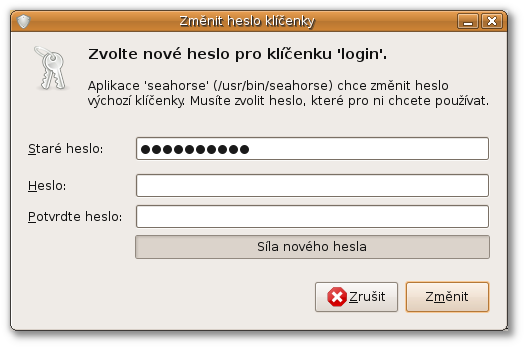
- Budete upozorněni vyskakovacím oknem na možná rizika. Okno jednoduše odsouhlaste.
Touchegg
This is where touchégg comes into light. Touchégg is “a multitouch gesture recognizer for GNU/Linux that allows associating actions to each gesture”. My first experience with it was somehow abruptly ended by segmentation faults when using the packaged version that is just an apt-get install touchegg away. I did my research and managed to get it to work fine, using tutorials here and a handy config file from the Elementary OS website, basically building touchégg from source.
Here’s how I got it to work on my machine:
- Download the touchégg source code from here and unpack it;
- Download and install dependencies with this handy command:
sudo apt-get build-dep touchegg. This will pull and install necessary dependencies. - cd to the source directory and run these commands:
$ qmake$ make (Note that the make command take a couple of minutes to complete; it’s okay, just look for potential errors in the output. You should be fine.)$ sudo make install- Using your favorite text editor, copy the config file from the eOs website and save it under ~/.config/touchegg/touchegg.conf
- Add touchegg to the list of startup applications, so that it, well, starts up at login.
And voilà ! You’ve got a couple of multitouch gestures that work quite well in an OS X way. For instance, with this config file, a three-fingers swipe to the left or right switches workspaces, up or down switches would show workpsaces or expose open windows respectively, and a four-fingers swipe up resizes the current window.
UPDATE: I made a GitHub repo here: https://github.com/louisduhamel/touchegg-config/. Thanks Robert for the suggestion!
You can also find the file below.
Touchegg.conf:
<touchégg>111
BUTTON=1
Super+a
Super+s
Super+Left
Super+Right
Control+Super+Right
Control+Super+Left
SPEED=7:INVERTED=true
Control+minus
Control+plus
BUTTON=2
BUTTON=3
BUTTON=1
Gwenview, Shotwell, Evince”>
Control+L
Control+KP_Add
Control+KP_Subtract
Control+R
Alt+Home
Control+Next
http://www.howtogeek.com/howto/43097/how-to-get-macbook-style-finger-gestures-on-ubuntu-linux/
http://louisduhamel.fr/multitouch-os-x-like-gestures-in-elementary-os/41. Instalace TrueCrypt:
sudo add-apt-repository ppa:stefansundin/truecrypt sudo apt-get update sudo apt-get install truecryptyou can also right-click the file and click on execute to do the same job from GUI
or from terminal „cd“ your way to the file location and use „./“ then file name to execute it.
./truecrypt-7.1a-setup-x86Install TrueCrypt with AppIndicator instead of tray icon in Ubuntu
sudo add-apt-repository ppa:stefansundin/truecrypt
 sudo apt-get update && sudo apt-get install truecrypt


After Installing Ubuntu 14.04 Trusty Tahr, there are a wealth of things that need to be dealt with, including Hardware Drivers, DVD, Audio and Video Codecs, Archiving formats, generally useful stuff.
These instructions presume you are proficient with PPAs, .Debs, and other terminal commands, Ubuntu Tweak, and require a full set of video, audio, and archive codecs, as well as Skype, Flash, and a truck-load of wallpapers.
1. Enable Partner Repositories
The partner repositories are another source of software, but for those with restrictive licenses that mean the general public cannot simply share them, such as Flash and Skype. These are official repo’s that are already added but disabled in Ubuntu. This command enables them.
Both GetDeb and PlayDeb are repositories, sources of updates for actual software you have or will have installed. They are useful for getting more up-to-date versions than those that ship in the official Ubuntu repositories, which programmers can find difficult to update as they encounter red tape. They may also contain less popular software which is not listed in the official repo’s.
LibDVDCSS is a library required for reading some DVDs. Unfortunately, due to legal issues, it is not included by default. This repository is provided by Videolan, and requires a bit more code to add.