Lenovo S440 doinstalace – Ubuntu 18.04 LTS
Nastavení systému → Vzhled →
- tapeta, velikost launcheru
– chování, jednoklik, koš, spustitelné soubory
– povolit pracovní plochy
– uživatel v liště a čas - Nastavení systému →Software a aktualizace –
-zdroje software na hlavní server
– zapnout partnery Canonicalu
– dodatečné ovladače - /etc/logrotate nastavit na 1
- Nastavení systému → Jazyková podpora
- gnome-terminal
vypnout klávesové zkratky
upravit barevný profil - apt-get update && apt-get upgrade -y
doinstalovat dodatečné ovladače - apt-get install -y synaptic numlockx gdebi atop rdesktop filezilla winetricks gkrellm mc gnome-tweak-tool ubuntu-restricted-extras nautilus-dropbox compizconfig-settings-manager cairo-dock ssh audacious audacity gparted qbittorrent playonlinux cups-pdf k3b xsane inkscape gnome-system-tools nautilus-image-converter preload bleachbit zram-config chromium-browser flashplugin-installer gimp kde-l10n-cs xfonts-biznet-100dpi xfonts-biznet-75dpi xfonts-biznet-base krusader meld kget arj vlc unace gpodder kdiff3 krename lhasa rar rpm kate
- Mount Image Files (zastaralé)
This patch for Nautilus allows you mount image (.iso) files by right clicking on them. Just download and install this.deb file.
Then restart Nautilus
sudo killall nautilus - Zadat uživatele a upravit (gnome-system-tools) práva.
- Gnome Shell a Plasma desktop
apt-get install gnome-shell plasma-desktop docky - Cinnamon
apt install cinnamon-desktop-environment lightdm - Nastavit klávesové zkratky, interní editor a vlastní ministatus v mc.
- ubuntu-unity-desktop
- Dash to Dock
sudo apt-get install chrome-gnome-shell
Dash to Dock v63 will be available to upgrade/install via the GNOME Extensions website at some point in the coming weeks (the update is currently pending review).
Dash to Dock on GNOME Extensions
If you’re impatient you can download the latest release from Github, though be aware that you’ll need to install the extension manually by extracting the .zip and placing the relevant folder in the ~/.local/share/gnome-shell/extensions folder.
- Disk Google:
https://www.howtogeek.com/196635/an-official-google-drive-for-linux-is-here-sort-of-maybe-this-is-all-well-ever-get/ Playonlinux z repozitáře pro Thrusty Tar wget -q "http://deb.playonlinux.com/public.gpg" -O- | sudo apt-key add - sudo wget http://deb.playonlinux.com/playonlinux_trusty.list -O /etc/apt/sources.list.d/playonlinux.list sudo apt-get update- https://www.virtualbox.org/wiki/Downloads
- Flexibee
https://www.flexibee.eu/podpora/stazeni-flexibee/ - Safile
http://www.seafile.com/en/download/ - Electrum waletapt install electrum
- Electrum walet LTC
sudo apt-get install python-qt4 python-pip python-dev
sudo apt-get install python-slowaes # on Ubuntu 13.10 and higher
sudo pip install https://electrum-ltc.org/download/Electrum-LTC-2.1.1.1.tar.gz
electrum-ltc - enable zswap
you need to edit /etc/default/grub
edit line toGRUB_CMDLINE_LINUX=“zswap.enabled=1″and run
update-grubto generate boot configure for grub
after done all of these, reboot your system, happy time. - Vypnout otravné hlášky:sudo -i gedit /etc/default/apport
Obsah souboru pak vypadá takto:
# set this to 0 to disable apport, or to 1 to enable it
# you can temporarily override this with
# sudo service apport start force_start=1
enabled=0 Oracle Java
sudo add-apt-repository ppa:webupd8team/java
sudo apt-get update && sudo apt-get install oracle-java8-installerandrei@desktop:~$
java -versionjava
version „1.8.0-ea“
Java(TM)
SE Runtime Environment (build 1.8.0-ea-b54)
Java HotSpot(TM) Server VM (build 24.0-b21, mixed mode)andreidesktop:~$
javac -versionjavac
1.8.0-easudo update-java-alternatives -s java-7-oracle
or
sudo update-java-alternatives -s java-8-oracleUBUNTU TWEAK
sudo apt-get update && sudo apt-get upgrade
sudo add-apt-repository ppa:tualatrix/ppa
sudo apt-get update && sudo apt-get install ubuntu-tweakOpenDNS ip address:
208.67.222.222
208.67.220.220Úprava velikosti swapu (volitelně)
To permanently change this value:
gksudo gedit /etc/sysctl.conf
Search for vm.swappiness and change its value as desired. If vm.swappiness does not exist, add it to the end of the file like so:
vm.swappiness=10
Finally, save the file and rebootDisable Guest Session (volitelně)
If you would like to remove the ability for a Guest to log onto your computer, simply run this command:
sudo /usr/lib/lightdm/lightdm-set-defaults –allow-guest false
To revert this simply run the command again with true at the end instead of false.
iFuse (iPod, iPhone Libraries)
Note: This was tested in 11.10 and not 12.04. Try this at your own risk, and please e-mail me your results.
Okay, admittedly I’m not an iDevice user, and never will be. But from what I’ve looked into this is the proper way to get music programs like Rhythmbox to recognize your iDevice. If you have any useful information on this topic please email me at rowan [at] mindseeder [dot] com.
sudo apt-get install ifuse libimobiledevice-utils
idevicepair unpair && idevicepair pairNote: If you’re getting a -5 Error, try this:
sudo apt-get install libimobiledevice4-dbg libimobiledevice-dev
idevicepair unpair && idevicepair pairEnable multitouch:
Tiskárny
Lexmark:
https://www.dropbox.com/s/y0p1y4p9apxrcjd/lexmark.zip?dl=0Kalkulačka v Dashi
sudo add-apt-repository ppa:scopes-packagers/ppa sudo apt-get update sudo apt-get install unity-lens-utilities unity-scope-calculator
Úklid Firefoxu
http://askubuntu.com/questions/389026/what-trusted-file-cleaning-tools-are-available-for-ubuntu
http://petrkrcmar.blog.root.cz/2009/07/12/jak-vycistit-databaze-a-urychlit-si-firefox/Pokud se nechcete zabývat detaily nebo neumíte anglicky, tady je celý postup zjednodušeně:
0) vypněte Firefox – budete se mu hrabat v databázi
1) Nainstalujte balíček sqlite3, určitě bude ve vaší distribuci.
2) Navštivte adresář s profilem. Bude ve vašem domovském adresáři v .mozilla/firefox. Ještě musíte do podadresáře s krkolomným automaticky generovaným názvem.
3) Spusťte v něm následující příkaz:for z in *.sqlite; do echo „VACUUM;“ | sqlite3 „$z“; done
Operace bude trvat několik desítek sekund. Moje databáze (dohromady všechny soubory s příponou .sqlite) se po akci smrskly z 81 na 60 MB.
Výrazně se tím zrychlil start Firefoxu a navíc jsou hned dostupné všechny informace, jako třeba historie.
Dříve bylo potřeba po rozklepnutí menu pár sekund počkat, než se vše načte z disku do paměti a utřídí.
Pak teprve se informace objevily. Teď je vše připraveno okamžitě po načtení.- Přizpůsobení Unity:
http://www.root.cz/clanky/jak-si-prizpusobit-unity-aby-se-dalo-pouzivat/ Automatic brightness control
If you want to change the brightness on ac-adaper plug-on/off, add the following in /etc/acpi/handler.sh:
ac_adapter) case "$2" in AC|ACAD|ADP0|ACPI0003:00) case "$4" in 00000000) logger 'AC unpluged' echo "20" > /sys/class/backlight/acpi_video0/brightness ;; 00000001) logger 'AC pluged' echo "50" > /sys/class/backlight/acpi_video0/brightness ;; esac ;;Power consumption
With cpupower, laptop-mode-toolsAUR and acpid installed and graphics switched to intel gpu, I get over 9 hours battery life.
apt-get install linux-tools-common
 sudo apt-get install indicator-cpufreq
Fingerprint scanner
Buď toto (a nebo raději GUI):
To get that working you need fprintd and libfprint-vfs5011-gitAUR. Follow the Fprint guide for the rest.
– Add this PPA to your sources:
sudo add-apt-repository ppa:fingerprint/fprint
sudo apt-get update
sudo apt-get upgrade– Install the software:
sudo apt-get install libfprint0 fprint-demo libpam-fprintd gksu-polkit(Note: If you have experimented with fingerprint authentication before and have changed your /etc/pam.
d/common- auth, you may be presented with a screen asking whether you want to override those changes. Select Yes. Under very special circumstances, you may get an error saying
pam-auth-update: Local modifications to /etc/pam.d/common- *, not updating.
pam-auth-update: Run pam-auth-update –force to override.
In this case, run “sudo pam-auth-update –force”, exactly as suggested, and enable the fprintd profile manually. Leave the standard system profiles (Unix, Keyring and ConsoleKit) enabled as well.)– Launch “fprint project demo” and check that you can enroll and verify your fingerprints and that your reader is indeed supported.
– Run “fprintd-enroll” in terminal to save your fingerprint.
That’s all! Test it: Lock and unlock screen, log out and back in, try sudo in terminal.
https://launchpad.net/~fingerprint/+archive/ubuntu/fprint
Fingerprint GUI:
sudo add-apt-repository ppa:fingerprint
/fingerprint- gui
sudo apt-get updateInstall the packages:
sudo apt-get install libbsapi policykit-
1-fingerprint- gui fingerprint-gui Log out of your session and log back in (we need the new session defaults to be picked up).
Setup
=====
After installation launch “Fingerprint GUI” and enrol your fingerprints.
That should be all you need to do!
Try locking your screen, logging out and in, sudo in terminal and running graphical apps requiring root privileges.https://launchpad.net/~fingerprint/+archive/ubuntu/fingerprint-gui
Zrušení hesla implicitní klíčenky:
Zrušení zadávání hesla
 Tímto krokem snižujete bezpečnost svého systému
Při používání aplikací, které ukládají hesla do klíčenky, je potřeba vždy zadat heslo. Tomu se dá zabránit následujícím postupem:
- V záložce Hesla změňte heslo u položky login

- Vyplňte Staré heslo a políčka Heslo a Potvrďte heslo nechte prázdná.
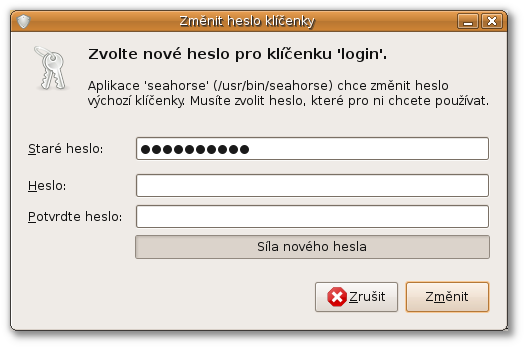
- Budete upozorněni vyskakovacím oknem na možná rizika. Okno jednoduše odsouhlaste.
Touchegg
This is where touchégg comes into light. Touchégg is “a multitouch gesture recognizer for GNU/Linux that allows associating actions to each gesture”. My first experience with it was somehow abruptly ended by segmentation faults when using the packaged version that is just an apt-get install touchegg away. I did my research and managed to get it to work fine, using tutorials here and a handy config file from the Elementary OS website, basically building touchégg from source.
Here’s how I got it to work on my machine:
- Download the touchégg source code from here and unpack it;
- Download and install dependencies with this handy command:
sudo apt-get build-dep touchegg. This will pull and install necessary dependencies. - cd to the source directory and run these commands:
$ qmake$ make (Note that the make command take a couple of minutes to complete; it’s okay, just look for potential errors in the output. You should be fine.)$ sudo make install- Using your favorite text editor, copy the config file from the eOs website and save it under ~/.config/touchegg/touchegg.conf
- Add touchegg to the list of startup applications, so that it, well, starts up at login.
And voilà ! You’ve got a couple of multitouch gestures that work quite well in an OS X way. For instance, with this config file, a three-fingers swipe to the left or right switches workspaces, up or down switches would show workpsaces or expose open windows respectively, and a four-fingers swipe up resizes the current window.
UPDATE: I made a GitHub repo here: https://github.com/louisduhamel/touchegg-config/. Thanks Robert for the suggestion!
You can also find the file below.
Touchegg.conf:
<touchégg>111
BUTTON=1
Super+a
Super+s
Super+Left
Super+Right
Control+Super+Right
Control+Super+Left
SPEED=7:INVERTED=true
Control+minus
Control+plus
BUTTON=2
BUTTON=3
BUTTON=1
Gwenview, Shotwell, Evince”>
Control+L
Control+KP_Add
Control+KP_Subtract
Control+R
Alt+Home
Control+Next
http://www.howtogeek.com/howto/43097/how-to-get-macbook-style-finger-gestures-on-ubuntu-linux/
http://louisduhamel.fr/multitouch-os-x-like-gestures-in-elementary-os/Specifikace Lenova S 440
http://www.ubuntu.com/certification/hardware/201306-13872/components/
https://wiki.archlinux.org/index.php/Lenovo_ThinkPad_S440Podpora SSD

5 crucial optimizations for SSD usage in Ubuntu Linux
 I bought my first SSD more than 5 years ago (late 2007), for my white MacBook Core2Duo 2.0 Ghz. It may be needless to say that my MacBook ran faster than many MacBook Pro’s at that time. The look on peoples faces when they saw my MacBook boot faster than their MacBook Pro was unforgettable.
By that time I was also experimenting with running 2 x 8GB CompactFlash with SATA converters in RAID-0 mode in my completely silent (but old and under-clocked) Pentium 3 Linux desktop. When people would visit my home they couldn’t believe my PC was actually turned on: it was dead silent.
Even today I still enjoy building low-power, silent and ultra-fast (Linux) computers with an SSD as the primary drive. Nowadays the new mSATA standard (see picture) is being used. During the past years I learned a thing or two about configuring Linux on a SSD drive. Today I will share those things with you:
1) Buy more than enough RAM
Yep, you should have at least 16GB of RAM. I know you’ll say that you don’t use that, but that is exactly the point. If you would be using it, it would not be enough. And why not? RAM is relatively cheap these days and you don’t want your system to start swapping, since this will wear out your expensive SSD.
2) Use the default partition layout
Contrary to popular belief, the default (guided) partitioning will do. If you partition manually, keep in mind that you do need a swap partition that is bigger than your RAM size.
3) Avoid using swap
You have plenty of RAM, so you could turn off swap or even create a system without swap. I have been running without swap for a year or so and never experienced significant problems (other people say the same). The most annoying side-effect is that the hibernate function is not available, since it uses the swap partition. This is why I recommend to not completely disable swap, but to reduce the swappiness of Linux. This way Linux will use all available RAM before starting to write to your precious SSD, while still allowing you to hibernate. Still, be aware when it comes to using hibernate, because it uses a lot of writes. Run this one-liner to add a permanent swappiness setting:
1echo -e "vm.swappiness=0" | sudo tee -a /etc/sysctl.confThis will only be effective after reboot.
4) Disable access time logging
Remove the access time logging on the file system. Without the “noatime” flag on your file system every read will cause a write, because the file system will update the access time. This is bad for the life-time of your SSD, since it supports a limited number of writes and this is causing significantly more writes. Edit the “fstab” to add the “noatime” flag:
1sudo nano /etc/fstabNow change “errors=remount-ro” to “noatime,errors=remount-ro”. Save the file and reboot.
5) Enable TRIM
TRIM will stop your SSD from slowing down after using it for a while. If you do not enable TRIM the writes may become slower due to the erasing of the deleted blocks. By running this one-liner you can add TRIM as a daily cron job:
1echo -e "#\x21/bin/sh\\nfstrim -v /" | sudo tee /etc/cron.daily/trimYou have to make the cron job executable using:
1sudo chmod +x /etc/cron.daily/trimIt will be run every day to avoid slowing down your writes and you will hardly notice it.
More advice: monitor the expected life-time
Your disk will not run forever. It has an expected life-time and you should probably monitor it using:
1sudo smartctl -data -A /dev/sdaThis will output something like this:
123456789101112131415161718maurits@nuc:~$ sudo smartctl -data -A /dev/sdasmartctl 5.41 2011-06-09 r3365 [x86_64-linux-3.8.0-26-generic] (local build)Copyright (C) 2002-11 by Bruce Allen, http://smartmontools.sourceforge.net=== START OF READ SMART DATA SECTION ===SMART Attributes Data Structure revision number: 18Vendor Specific SMART Attributes with Thresholds:ID# ATTRIBUTE_NAME FLAG VALUE WORST THRESH TYPE UPDATED WHEN_FAILED RAW_VALUE1 Raw_Read_Error_Rate 0x0000 006 000 000 Old_age Offline - 63 Spin_Up_Time 0x0000 100 100 000 Old_age Offline - 04 Start_Stop_Count 0x0000 100 100 000 Old_age Offline - 05 Reallocated_Sector_Ct 0x0000 100 100 000 Old_age Offline - 09 Power_On_Hours 0x0000 100 100 000 Old_age Offline - 259212 Power_Cycle_Count 0x0000 100 100 000 Old_age Offline - 258232 Available_Reservd_Space 0x0000 100 100 000 Old_age Offline - 4914564640233 Media_Wearout_Indicator 0x0000 100 000 000 Old_age Offline - 100maurits@nuc:~$At ID# 233 you see the MWI. This is a value starting at 100 and when it reaches values below 10 you should start to worry. Note that different manufacturers may have different names and numbers for this indicator.
Final advice: avoid buying TLC drives
Triple Level Cell (TLC) drives are making their entry in the market. These drives have a dramatically lower expected life-time. The life-time of a drive is measured in Program/Erase (PE) cycles or in Peta Bytes Written (PBW). Check the specs carefully to avoid buying a cheap drive, thinking you made a good deal, while actually buying a model with a lower expected life-time.
How to Tweak Your SSD in Ubuntu for Better Performance

There are lots of tips out there for tweaking your SSD in Linux and lots of anecdotal reports on what works and what doesn’t. We ran our own benchmarks with a few specific tweaks to show you the real difference.
Benchmarks
To benchmark our disk, we used thePhoronix Test Suite. It’s free and has a repository for Ubuntu so you don’t have to compile from scratch to run quick tests. We tested our system right after a fresh installation of Ubuntu Natty 64-bit using the default parameters for the ext4 file system.

Our system specs were as follows:
- AMD Phenom II quad-core @ 3.2 GHz
- MSI 760GM E51 motherboard
- 3.5 GB RAM
- AMD Radeon 3000 integrated w/ 512MB RAM
- Ubuntu Natty
And, of course, the SSD we used to test on was a 64GB OCZ Onyx drive ($117 on Amazon.comat time of writing).
Prominent Tweaks
There are quite a few changes that people recommend when upgrading to an SSD. After filtering out some of the older stuff, we made a short list of tweaks that Linux distros have not included as defaults for SSDs. Three of them involve editing your fstab file, so back that up before you continue with the following command:
sudo cp /etc/fstab /etc/fstab.bak
If something goes wrong, you can always delete the new fstab file and replace it with a copy of your backup. If you don’t know what that is or you want to brush up on how it works, take a look atHTG Explains: What is the Linux fstab and How Does It Work?
Eschewing Access Times
You can help increase the life of your SSD by reducing how much the OS write to disk. If you need to know when each file or directory was last accessed, you can add these two options to your /etc/fstab file:
noatime,nodiratime
Add them along with the other options, and make sure they’re all separated by commas and no spaces.

Enabling TRIM
You can enable TRIM to help manage disk performance over the long-term. Add the following option to your fstab file:
discard
This works well for ext4 file systems, even on standard hard drives. You must have a kernel version of at least 2.6.33 or later; you’re covered if you’re using Maverick or Natty, or have backports enabled on Lucid. While this doesn’t specifically improve initial benchmarking, it should make the system perform better in the long-run and so it made our list.
Tmpfs
The system cache is stored in /tmp. We can tell fstab to mount this in the RAM as a temporary file system so your system will touch the hard drive less. Add the following line to the bottom of your /etc/fstab file in a new line:
tmpfs /tmp tmpfs defaults,noatime,mode=1777 0 0
Save your fstab file to commit these changes.
Switching IO Schedulers
Your system doesn’t write all changes to disk immediately, and multiple requests get queued. The default input-output scheduler – cfq – handles this okay, but we can change this to one that works better for our hardware.
First, list which options you have available with the following command, replacing “X” with the letter of your root drive:
cat /sys/block/sdX/queue/scheduler
My installation is on sda. You should see a few different options.

If you have deadline, you should use that, as it gives you an extra tweak further down the line. If not, you should be able to use noop without problems. We need to tell the OS to use these options after every boot so we’ll need to edit the rc.local file.
We’ll use nano, since we’re comfortable with the command-line, but you can use any other text editor you like (gedit, vim, etc.).
sudo nano /etc/rc.local
Above the “exit 0” line, add these two lines if you’re using deadline:
echo deadline > /sys/block/sdX/queue/scheduler
echo 1 > /sys/block/sdX/queue/iosched/fifo_batch
If you’re using noop, add this line:
echo noop > /sys/block/sdX/queue/scheduler
Once again, replace “X” with the appropriate drive letter for your installation. Look over everything to make sure it looks good.

Then, hit CTRL+O to save, then CTRL+X to quit.
Restart
In order for all these changes to go into effect, you need to restart. After that, you should be all set. If something goes wrong and you can’t boot, you can systematically undo each of the above steps until you can boot again. You can even use aLiveCD or LiveUSB to recoverif you want.
Your fstab changes will carry through the life of your installation, even withstanding upgrades, but your rc.local change will have to be re-instituted after every upgrade (between versions).
Benchmarking Results
To perform the benchmarks, we ran the disk suite of tests. The top image of each test is before tweaking the ext4 configuration, and the bottom image is after the tweaks and a reboot. You’ll see a brief explanation of what the test measures as well as an interpretation of the results.
Large File Operations


This test compresses a 2GB file with random data and writes it to disk. The SSD tweaks here show in a roughly 40% improvement.


IOzone simulates file system performance, in this case by writing an 8GB file. Again, an almost 50% increase.


Here, an 8GB file is read. The results are almost the same as without adjusting ext4.


AIO-Stress asynchronously tests input and output, using a 2GB test file and a 64KB record size. Here, there’s almost a 200% increase in performance compared to vanilla ext4!
Small File Operations


An SQLite database is created and PTS adds 12,500 records to it. The SSD tweaks here actually slowed down performance by about 10%.


The Apache Benchmark tests random reads of small files. There was about a 25% performance gain after optimizing our SSD.


PostMark simulates 25,000 file transactions, 500 simultaneously at any given time, with file sizes between 5 and 512KB. This simulates web and mail servers pretty well, and we see a 16% performance increase after tweaking.


FS-Mark looks at 1000 files with a total size of 1MB, and measures how many can be completely written and read in a pre-ordained amount of time. Our tweaks see an increase, again, with smaller file sizes. About a 45% increase with ext4 adjustments.
File System Access


The Dbench benchmarks test file system calls by clients, sort of like how Samba does things. Here, vanilla ext4’s performance is cut by 75%, a major set-back in the changes we made.


You can see that as the number of clients goes up, the performance discrepancy increases.


With 48 clients, the gap closed somewhat between the two, but there’s still a very obvious performance loss by our tweaks.


With 128 clients, the performance is almost the same. You can reason that our tweaks may not be ideal for home use in this kind of operation, but will provide comparable performance when the number of clients is greatly increased.


This test depends on the kernel’s AIO access library. we’ve got a 20% improvement here.


Here, we have a multi-threaded random read of 64MB, and there’s a 200% increase in performance here! Wow!


While writing 64MB of data with 32 threads, we still have a 75% increase in performance.


Compile Bench simulates the effect of age on a file system as represented by manipulating kernel trees (creating, compiling, patching, etc.). Here, you can see a significant benefit through the initial creation of the simulated kernel, about 40%.


This benchmarks simply measures how long it takes to extract the Linux kernel. Not too much of an increase in performance here.
Summary


The adjustments we made to Ubuntu’s out-of-the-box ext4 configuration did have quite an impact. The biggest performance gains were in the realms of multi-threaded writes and reads, small file reads, and large contiguous file reads and writes. In fact, the only real place we saw a hit in performance was in simple file system calls, something Samba users should watch out for. Overall, it seems to be a pretty solid increase in performance for things like hosting webpages and watching/streaming large videos.
Keep in mind that this was specifically with Ubuntu Natty 64-bit. If your system or SSD is different, your mileage may vary. Overall though, it seems as though the fstab and IO scheduler adjustments we made go a long way to better performance, so it’s probably worth a try on your own rig.
Have your own benchmarks and want to share your results? Have another tweak we don’t know about? Sound out in the comments!
http://www.howtogeek.com/62761/how-to-tweak-your-ssd-in-ubuntu-for-better-performance/
——-Avoid exaggerated measures
1. First a word of caution:don’t exaggerate!There’s a lot of exaggeration to be found on the web on this issue.
On the one hand you have people who don’t take any special measures for SSD’s at all, and on the other hand you see people who take all kinds of extreme and complicated precautions. Neither side is behaving sensibly.
This how-to is meant to be a „best practice“. It’ll show you how to achieve a very good result by applying just a few rather simple measures. With those, you’ll be able to enjoy your SSD carefree, for years and years to come!
Taking into account the long warranty periods that the manufacturers are giving, probably for more than five years (10 years should be a reasonable expectation). Considerably longer than an ordinary platter hard disk, anyway…
Alignment is not necessary anymore
1.1. A common misunderstanding is, that the partitions on the SSD should be properly aligned first. That used to be true years ago, but no longer.
In the current versions of Ubuntu and Linux Mint, and in Debian since Wheezy, all tools automatically align filesystems and partitions to the optimal 4096 byte page size. So there’s no need to do anything for alignment on an SSD.
BIOS and UEFI: set it to AHCI
2. A Solid State Disk, or rather Drive (SSD), is sometimes only recognized properly by the BIOS or UEFI, when in the BIOS/UEFI the feature AHCI has been activated for SATA (instead of IDE).
This feature may be hard to find in the BIOS/UEFI, because there’s absolutely no standardization at all in menu structures for BIOS and UEFI (sigh….).
That’s why I’ve made two screen shots of the BIOS of my computer, in which you can see this particular feature. Hopefully it’ll help you to find it in your own BIOS/UEFI…. The motherboard of my computer is, by the way, an MSI H61MA-E35 (B3).
Note:doesn’t the BIOS or UEFI of your computer offer the option to switch to AHCI? Then the BIOS/UEFI might possibly detect the SSD automatically and automatically choose the right BIOS settings for it.
First of all, in the BIOS of my computer I go to the tabAdvanced, and there I expand the sectionIntegrated Peripherals(click on the image below to enlarge it):

Then, under the header „SATA Configuration“, I change IDE into AHCI Mode. Namely for SATA Mode.
Then, under the header „External SATA 6GB/s Configuration“, I also change IDE into AHCI. Namely for External SATA 6gb/s Controller Mode.
See the image below (click on it to enlarge it):

Check for updated firmware
3. Check the website of the SSD manufacturer, whether there’s an updated version available of the firmware for your SSD. If so, apply it.
For most SSD’s it doesn’t matter that you’re running Linux, because many manufacturers offer such firmware updates by means of an iso file with which you cancreate a bootable CD, much like Ubuntu and Linux Mint do.
In the first year after purchase, repeat this check every month or so.
Avoid quick wear: reduce write actions
4. A Solid State Drive is worn down relatively quickly by write actions. Especially the oldest generations of SSD’s were vulnerable in that aspect, but to a lesser degree that’s still the case for the newer generations.
Below you’ll find some tips on keeping wear down to a reasonable minimum, by limiting the write actions. Within reason, because a modern SSD is already pretty wear-resistant by default.
When you apply my tips, a lifespan of more than 10 years should be a normal expectation for your SSD. Which is considerably longer than the average lifespan of an old-fashioned platter disk.
Note:these directions are only meant for a Solid State Drive (SSD), not for an ordinary conventional hard disk!
Optional: reserve seven percent for overprovisioning
5. Over-provisioning (with or without a dash) is a technique that’s being used to improve the performance and life span of an SSD. I won’t explain it here, but it boils down tonotformatting a part of the SSD, which then remains unallocated space (unused capacity).
General opinion used to be, that it’s wise to reserve as much as 28 percent of the storage capacity of an SSD for such unallocated space. That’s of course a huge slice out of the total storage capacity, which makes nobody happy….
However, in the newer generations of SSD’s the technology and firmware have improved so much, that such huge losses of storage capacity aren’t needed anymore. Not for normal use, anyway.
But to be on the safe side, you might still reserve about seven percent for unallocated space. That’s not a big loss of storage capacity, and it might be beneficial on the very long term.
See the screenshot below of my own SSD, in which the seven percent unallocated space has been highlighted (click on the image to enlarge it):

I only mention it as option and not as advice, because it’s unclear whether this is still useful nowadays. Yet on my own SSD’s I still apply this.
During installation: select EXT4
6. The best file system (formatting) for an SSD, is the usual default EXT4. So you don’t have to choose anything different in this respect.
The journaling that comes with EXT4 causes some write activity, but not very much. Plus journaling is a very important feature for system crash recovery, so you don’t want to disable it.
Note:don’t select the BTRFS file system! Because under certain circumstances, BTRFS causes a huge amount of write actions.
After the installation: noatime
7. With „noatime“ in /etc/fstab, you disable the write action „access time stamp“, that the operating system puts on a file whenever it’s being read by the operating system. For an SSD „noatime“ is much better.
You can do that as follows:
a. First make sure that you have installed the applicationsgksuandleafpad:
Launch a terminal window.
(You can launch a terminal window like this: *Click*)Type (or copy/paste):
sudo apt-get install gksu leafpadPress Enter and submit your password. Please note that the password will remain invisible, not even asterisks will show, which is normal.
b. Then type in the terminal (use copy/paste):
gksudo leafpad /etc/fstabPress Enter.
c. Now add „noatime“ to the line for your root partition and your other Linux partitions. Not to the line for the swap partition!
An adapted line may look like this:
UUID=f0ae2c59-83d2-42e7-81c4-2e870b6b255d / ext4 noatime,errors=remount-ro 0 1Note:this isoneline, not two! It might appear to be two lines (dependent on your screen size), because of the length of the line.
d. Save the modified text file and close it.
e. Now proceed to the next item.
Still relevant for Ubuntu 14.04 and Linux Mint 17.1: automatic TRIM by rc.local, by cron or by discard
8. The cleaning action TRIM is necessary for the good performance of your SSD in the long run. Otherwise it’ll become very slow after some time.
All modern SSD’s support TRIM, but older SSD’s from before 2010 usually not. So for an older SSD you’ll want to check this on the website of the manufacturer.
It’s easiest to let the system perform an automatic TRIM. That can be done in several ways.
Note:in Ubuntu 14.04 and in Linux Mint 17.1 TRIM is enabled automatically, when you install Ubuntu 14.04 or Linux Mint 17.1 on an SSD. Namely by a „cron job“.
But this doesn’t happen automatically for all SSD’s. Furthermore, in most cases „cron“ is not the optimal method for TRIM anyway, so I advise you to read on.
Preferred method: by rc.local
8.1. You can add the TRIM command to /etc/rc.local. Then this command will be executed automatically on system boot. This hardly slows the boot process down.
This is the method that I prefer, because in most cases recoverable disk space then becomes fully usable again rather quickly.
You can do that as follows:
a. First make sure that you have installed the applicationsgksuandleafpad.
b. Then type in the terminal (use copy/paste):
gksudo leafpad /etc/rc.localPress Enter.
c. Above the lineexit 0in that file, you now add the TRIM command
fstrimfor every automatically mounted EXT4 partition.Note:not for partitions that aren’t mounted by default! And also not for the swap partition, as that’s already being trimmed automatically by the system by default, during the boot process.
An example is most clarifying. When your Ubuntu or Linux Mint is on one single partition, so you have only the root partition/, then your rc.local should look like this:
#!/bin/sh -e
#
# rc.local
#
# This script is executed at the end of each multiuser runlevel.
# Make sure that the script will „exit 0“ on success or any other
# value on error.
#
# In order to enable or disable this script just change the execution
# bits.
#
# By default this script does nothing.
fstrim /
exit 0If you have a separate home partition (although that’snot very useful), then you add the following line as well, aboveexit 0:
fstrim /homeNote:if you have a separate partition for/boot/efi, don’t add a trim command line for that in rc.local. It’s useless, as that partition is seldom being written to. And it may even cause malfunctions.
d. Save the modified file and close it.
e. Reboot your computer.
Disable the superfluous weekly cron job for TRIM
8.1.1. In Ubuntu 14.04 and Linux Mint 17.1, disable the now superfluous weekly cron job for TRIM:
Copy/paste the following command line into the terminal:
sudo mv -v /etc/cron.weekly/fstrim /fstrimPress Enter.
With that command you’ve transferred the script file fstrim to the root directory, thus disabling it.
Now proceed to item 9 in the column on the right.
Only for computers that are always on: daily by cron
8.2. For computers that are always on (24 hours a day, seven days a week), a TRIM action that’s being executed when booting, is of course not useful.
In such a case you’re better off with a „timer“, i.e. with cron. Trimming daily is better than weekly, because then you don’t have to wait so long before recoverable disk space becomes fully usable again.
You can schedule a daily trimming as follows:
a. First make sure that you have installed the applicationsgksuandleafpad.
b. Then type in the terminal (use copy/paste):
gksudo leafpad /etc/cron.daily/trimPress Enter.
c. Copy/paste the following blue text into that empty text file:
#!/bin/sh
# call fstrim-all to trim all mounted file systems which support it
set -e
#
# This only runs on Intel and Samsung SSDs by default, as some SSDs with
# faulty firmware may encounter data loss when running fstrim under high I/O
# load (e. g. https://launchpad.net/bugs/1259829). You can append the
# –no-model-check option here to disable the vendor check and run fstrim on
# all SSD drives Like this (remove the hash):
#exec fstrim-all –no-model-check
exec fstrim-allSave the text file.
d. Now copy/paste the following command into the terminal, in order to make the file executable:
sudo chmod +x /etc/cron.daily/trimPress Enter. Type your password when prompted; this remains entirely invisible, not even dots will show, this is normal. Press Enter again.
e. Reboot your computer.
Ubuntu or Linux Mint will now perform the daily cron job automatically, at 06:25, or (when the computer isn’t on at that time), automatically at a later time on the same day.
Disable the superfluous weekly cron job for TRIM
8.2.1. In Ubuntu 14.04 and Linux Mint 17.1, disable the now superfluous weekly cron job for TRIM:
Copy/paste the following command line into the terminal:
sudo mv -v /etc/cron.weekly/fstrim /fstrimPress Enter.
With that command you’ve transferred the script file fstrim to the root directory, thus disabling it.
Now proceed to item 9 in the column on the right.
(continued in the column on the right)
https://sites.google.com/site/easylinuxtipsproject/ssd
This website is being sponsored by Google Ads.
Are you using an ad blocker? Then you’re also blocking my earnings from advertisements….
If you wish to support my website, you can configure your ad blocker to make an exception for this website.
Thanks in advance….
Not advised: by discard
8.3. Another widely used method for automatic TRIM is to add the optiondiscardto /etc/fstab, for the line for your root partition and for possible other Linux partitions that are being mentioned there.
Note:do not add it to the line for the swap partition, as that’s already being trimmed automatically by the system by default, during the boot process!
The disadvantage of this method is, that it may cause the system to slow down. Because it forces the system to apply TRIM instantly on every file deletion. That’s why this method is not my favourite.
Note:as already mentioned, old SSD’s made before 2010 usually don’t support TRIM. In that case it’s of course not useful to apply the option discard in fstab.
If you want to do it anyway, then this is how:
a. First make sure that you have installed the applicationsgksuandleafpad.
b. Then type in the terminal (use copy/paste):
gksudo leafpad /etc/fstabPress Enter.
c. Now add „discard“ to the line for your root partition and your other Linux partitions that are being mentioned in this file. Not to the line for the swap partition!
An adapted line may look like this:
UUID=f0ae2c59-83d2-42e7-81c4-2e870b6b255d / ext4 discard,errors=remount-ro 0 1Note:if you have a separate partition for/boot/efi, don’t add a trim command for that partition in fstab. It’s useless, as that partition is seldom being written to. And it may even cause malfunctions.
d. Save the modified text file and close it.
e. Reboot your computer.
f. Now proceed to item 9.
How to execute TRIM manually
9. You can execute TRIM manually as well, namely as follows:
Launch a terminal window.
(You can launch a terminal window like this: *Click*)Type (use copy/paste):
sudo fstrim -v /Press Enter. Type your password when prompted; this remains entirely invisible, not even dots will show, this is normal. Press Enter again.
This operation may last for minutes; it then looks as if the terminal has frozen. That’s not true, however; simply wait patiently….
Note: on a few SSD models (specifically two models from Crucial), executing this command when there’s high disk activity (I/O activity), might cause problems. So only apply it when there’s not much activity going on. Preferably with all other applications closed.
The above terminal command is enough when you have only one Ubuntu or Mint partition and a swap partition (because for the swap it’s unnecessary; the system takes care of that automatically).
When you have more mounted EXT4 partitions, you’ll have to adapt the command line accordingly. For example, if you have a separate home partition (although that’s not very useful), then the command is:
fstrim -v /homeNow proceed to the next item.
Limit swap wear
10. With the action described below, you limit the use of the swap partition (the virtual memory on the SSD). Without disabling it entirely, because that would go too far: in case ofextremeRAM load, Ubuntu has to be able to „swap“.
Ubuntu’s inclination to use the swap, is determined by a setting. The lower the setting number, the more system load is required before Ubuntu starts using the swap.
On a scale of 0-100, the default setting is 60. Which is much too high for normal desktop use, and only fit for servers. For SSD’s, it’s just crazy.
A detailed explanation can be foundhere(link dead? Then downloadthis pdf filewith the same content).
Now the how-to:
a. First make sure that you have installed the applicationsgksuandleafpad.
b. Now check your current swappiness setting. Type in the terminal (use copy/paste):
cat /proc/sys/vm/swappinessPress Enter.
The result will probably be 60.
c. Now type in the terminal (use copy/paste):
gksudo leafpad /etc/sysctl.confPress Enter.
d. Add the following blue lines, at the very end of the existing text in that file (use copy/paste to avoid errors):
# Sharply reduce swap inclination
vm.swappiness=1e. Save the file and close it.
f. Now proceed to the next item.
Almost ready after reboot
11. Reboot your computer.
Your SSD is almost ready now, but not quite. So after the reboot, proceed to the next item.
Limit the write actions of Firefox
12. You can limit the write actions of Firefox as follows.
a. Set the cache to 0:
Firefox menu button (with the three dashes on it) – Preferences – Advanced
TabNetwork
section „Cached Web Content“: tickOverride automatic cache managementand set the cache to 0 MB.b. If you haveinstalled Oracle Java, limit the write actions of the Java plugin:
launch the Java Control Panel – Tab General:
Temporary Internet Files – Settings…
Remove the tick for:Keep temporary files on my computer.Limit the write actions of Chrome and Chromium
13. The write actions of Google Chrome and Chromium can be limited as follows.
– Launch Chrome / Chromium.
– Now press the F12 key, in order to open the developers‘ console. Click on the little gear wheel in the panel of the console, in order to open the settings.
In the settings window you tick:Disable cache (while DevTools is open).
Unfortunately, this only works when the developers‘ console is open…. A workaround might be, to always open one extra tab in which you keep the developers‘ console opened. This should also have effect on the other, „normal“ tabs.
Note:user preference, so repeat in each user account.
Now proceed to the next item.
Ubuntu 12.04 and Linux Mint 13: change the scheduler to deadline
14. By default,Ubuntu 14.04 and Linux Mint 17.1use the I/O scheduler Deadline, which is good for both SSD’s and conventional platter hard disks. So for the scheduler, you don’t have to change anything in Ubuntu 14.04 or Linux Mint 17.1.
ButUbuntu 12.04 and Linux Mint 13by default still use the „old“ I/O scheduler CFQ, which is only fine for conventional hard disks but not for SSD’s, which are being slowed down. So it’s wise when you have an SSD in your machine, to change the scheduler in Ubuntu 12.04 or Linux Mint 13 to Deadline.
You can realize this by changing the boot parameters of Grub. You can do that as follows.
a. First make sure that you have installed the applicationsgksuandleafpad.
b. Then check your current scheduler as follows. Use copy/paste to transfer the following command line to the terminal:
cat /sys/block/sda/queue/scheduler(if your drive isn’tsda, change the line accordingly)
Press Enter.
In Ubuntu 12.04, the output will probably be:
noop deadline [cfq]Which means: cfq is active, but noop and deadline are also supported.
c. Now type (use copy/paste):
gksudo leafpad /etc/default/grubPress Enter.
Find this line:
GRUB_CMDLINE_LINUX_DEFAULT=“quiet splash“And replace it by this line:
GRUB_CMDLINE_LINUX_DEFAULT=“elevator=deadline quiet splash“d. Save the modified file and close it.
e. Now update Grub for this change. In the terminal (use copy/paste):
sudo update-grubPress Enter. Type your password when prompted; this remains entirely invisible, not even dots will show, this is normal. Press Enter again.
f. Reboot your computer.
g. Proceed to the next item.
Note:when you have only an SSD in your computer and no platter disk as well, then you may experience a slight performance benefit by choosingnoopfor scheduler, instead ofdeadline.
Do NOT enable hibernation
15. Hibernation causes a huge amount of write actions, which is very bad for an SSD.Make sure it’s disabled! (item 8, left column)
This is especially relevant for Linux Mint, because in Linux Mint hibernation is unfortunately enabled by default…
Also for an SSD: prevent fragmentation, and DO NOT defrag
16. For an SSD, fragmentation of the file system is a smaller problem than for ordinary rotating hard disks. But it’s nevertheless still a problem, so it’s useful to prevent fragmentation as much as possible on an SSD, too. You can achieve that by preservinga minimum of 20 % free space on each partition (item 4, left column).
Prevention is all the more important, as defragmenting is out of the question anyway: your SSD would wear rapidly, because of the many write actions it causes.
The reason that fragmentation is also a problem for an SSD, is this:
The mechanical seek time of an SSD is always 0, regardless of the fragmentation. That’s a big difference with rotating hard disks, on which the seek time increases as fragmentation grows. This is a significant improvement.
But mechanical seek time only makes up a part of total access time, or I/O time, of any single input/output request made to the disk.
I/O time is the time a computer system takes to complete a request cycle. All the way from application, operating system and driver down to disk hardware, memory cells, and then back again.
Zero mechanical seek time certainly does not mean zero I/O time. No matter how fast an SSD is, its I/O time can never be zero. File system fragmentation increases I/O time in an SSD, even when the mechanical seek time is zero.
To put it another way: the performance degradation as a result of fragmentation is not caused by the storage device alone (whether there’s a mechanical moving part or not), but it’s also a problem concerning the system as a whole.
The task for the system becomes heavier, when there are more files to be chopped up and more pieces of files to be glued together. The heavier the task, the longer the processing time.
A good and elaborate explanation of this factcan be found here. Website down? Here’sa pdf file.
Dual boot? Don’t let Windows kill your SSD
17. Do you have a dual boot with Windows? Then don’t let Windows kill your SSD by defragmenting it.
Defragmentation will kill your SSD in a very short time, because of the multitude of write actions that it causes.
Within Linux you don’t have this problem, because Linux filesystemshardly fragment in the first placeand so don’t need to be defragmented anyway.
Enjoy your SSD carefree for years and years
18. Now you’ll be able to enjoy your SSD carefree!
As already said in the start of this how-to: taking into account the long warranty periods that the manufacturers are giving, your SSD will probably last for more than five years (10 years should be a reasonable expectation).
Considerably longer than an ordinary platter hard disk generally lasts, anyway…
Want more tips?
19. Do you want more tips and tweaks for Ubuntu or Linux Mint? There’sa lot more of themon this website! Like these ones:
Security in Ubuntu and Linux Mint
Four popular myths and 11 tips about wireless security (for wifi)
Chrome and Chromium: make them even better
Libre Office: configure it well
Translation(s): none
This page is about optimal set up of an SSD (Solid State Drive). This page should be kept clean enough for beginners to get the most basic idea.
Obsah
- Basics
- Partitions and Alignment
- Mounting SSD filesystems
- Reduction of SSD write frequency via RAMDISK
- Persistent RAMDISK
- Low-Latency IO-Scheduler
- /etc/fstab example
- /etc/lvm/lvm.conf example
- Smaller system with SSD
- Adding vm.swappiness in sysctl for the kernel
- reduce swapping activities with ZRam
- Upgrading the Firmware
- SSD related bug reports
Basics
- Use a reasonably recent Linux kernel (at least 3.2 or newer).
- SSD caching is only supported on Linux 3.9 or newer.
- Use the latest firmware for the SSD
Use a command like: „sudo smartctl -a /dev/sda“ to check for issues.
- Update firmware as needed.
- Use the ext4 filesytem (the most mature filesystem) unless you have reason not to.
- The btrfs filesytem is still in experimental state (as of kernel 3.11) but supports additional mount options like „ssd“.
- Have enough DRAM required to operate without swap space under normal workloads.
- You need a swap partition that is larger than your DRAM to save all the DRAM content securely for hibernation.
- If your SSD size is too small for your DRAM size, think about placing your swap on the larger classic HDD.
- If you are planning on doing a huge amount of writes (more than 40-50 GB per day), it is advised to avoid SSDs that use TLC NAND.
These may also help:
http://siduction.org/index.php?module=news&func=display&sid=78
http://wiki.ubuntuusers.de/SSD(German)
Partitions and Alignment
You should consider to use theMulti HDD/SSD Partition Schemeto keep variable and bulk data on the HDD(s) and establish a fallback redundancy, if the system also has a HDD available (internal or external spinning disk).
Since Wheezy, all tools should automatically align filesystems and partitions to the 4096 byte page size. This is one of the most important optimization aspects. Here are good links for this subject:
Aligning filesystems to an SSD’s erase block size] by Ted T’so(kernel FS developer)
http://blog.nuclex-games.com/2009/12/aligning-an-ssd-on-linux/
Mounting SSD filesystems
The performance of SSDs is also influenced by filesystem mounting options:
- Add the „noatime“ (or „relatime“) mount option in /etc/fstab, to disable (or significantly reduce) disk writes whenever a file is read. Please note that since Linux kernel 2.6.30, „relatime“ is the default.
- This improves filesystem read performance for both SSDs and HDDs.
If desirable, enable the „discard“ filesystem options for automatic/online TRIM.
- Set „discard“ mount option in /etc/fstab for the ext4 filesystem, swap partition, Btrfs, etc. See mount(8).
- Set „issue_discards“ option in /etc/lvm/lvm.conf for LVM. See lvm.conf(5).
- Set „discard“ option in /etc/crypttab for dm-crypt.
The „discard“ optionsis not neededif your SSD has enough overprovisioning (spare space) or you leave (unpartitioned) free space on the SSD.
The „discard“ options with on-disk-cryptography (like dm-crypt) havedrawbacks with security/cryptography.
Seecrypttab(5).
Example for dm-crypt’s /etc/crypttab:
# var UUID=01234567-89ab-cdef-0123-456789abcdef none luks,discard
After changing filesystem options, update settings in all initramfs images:
$ sudo update-initramfs -u -k all
") Alternative to setting the „discard“ options is to set up an offline-trim cronjob that runstime fstrim -v (or mdtrim) on the ssd mountpoints periodically. Until software raid (md device layer) has trim support, you could use something like mdtrim (https://github.com/Cyberax/mdtrim/).
Alternative to setting the „discard“ options is to set up an offline-trim cronjob that runstime fstrim -v (or mdtrim) on the ssd mountpoints periodically. Until software raid (md device layer) has trim support, you could use something like mdtrim (https://github.com/Cyberax/mdtrim/).Reduction of SSD write frequency via RAMDISK
Use of RAMDISK can stop constantly changing files from hitting on the SSD (it may hit SSD via swap). RAMDISK configuration may be performed via
- Set RAMTMP, RAMRUN and RAMLOCK to „yes“ (in /etc/default/rcS or /etc/default/tmpfs since Wheezy). Of course, this will not improve writing to the SSD if your system (filesystem holding / or /tmp) is not located on it.
- /etc/fstab: line such as „tmpfs /tmp tmpfs noatime,nosuid 0 0“
- Optionally, make system only flush data to the disk every 10 minutes or more:
- Kernel settings like the „dirty_buffer_ratio“ etc. may only be available as non-path/mount specific global settings.
- Mount option „commit=600“ in /etc/fstab. See mount(8).
Or better, use pm-utils (Debian BTS #659260), tlp, or laptop-mode-tools (also optimizes read buffers) to configure the laptop-mode even under AC operation.
 Attention: Increasing the flushing interval from the default 5 seconds (maybe even until proper shutdown) leaves your data much more vulnerable in case of lock-ups or power failures, and seems to be a global setting.
Enabling RAMTMP may cause some (broken) applications to run out of temporary write disk space. In this case, setting TMPDIR environment variable for those programs pointing to a writable disk space should fix their situation. It might as well cause other unwanted side effects if the disk space occupied in your /tmp is high (e.g. unexpected swapping).
Please note files in /tmp are wiped out upon reboot unless /etc/default/rcS is set to something other than TMPTIME=0 (if not set, 0 is the default value).
Persistent RAMDISK
As an advanced option, you may consider to use persistent RAMDISK (dedicated read/write RAM buffer that gets synced periodically and on startup/shutdown) with anything-sync-daemon or goanysync set up:
- /home (synced to work-data-fs raid only once a day?), you only risk settings the true work in /home/*/work-data is on a dedicated raid
- /home/*/work-data/volatile (synced more frequently, once per hour?)
- /home/*/Downloads (synced to bulk-data-fs once a day?)
- /var completely if supported (syncing once a day? avoids spin-ups and allows to save /var also to SSD), at least set this up for
- /var/log if supported
- /var/cache/apt/archives
- Configure apt to delete package files after installing, to minimize the data to sync.
Options to having logs copied into RAM:
https://github.com/graysky2/anything-sync-daemon(if it supports this)
If /home is not on a persistent ramdisk, use profile-sync-daemon to have the browser database and cache copied into RAM during uptime (http://ubuntuforums.org/showthread.php?t=1921800https://github.com/graysky2/profile-sync-daemon)
/home/*/ (synced to root-fs or home-fs)
Further improvement: Patch anything-sync-daemon or goanysync to use a (copy-on-write) union filesystem mount (e.g.http://aufs.sourceforge.net) to keep changes in RAM and only save to SSD on unmount/shutdown (aubrsync), instead of copying all data to RAM and having to sync it all back.
Low-Latency IO-Scheduler
The default I/O scheduler queues data to minimize seeks on HDDs, which is not necessary for SSDs. Thus, use the „deadline“ scheduler that just ensures bulk transactions won’t slow down small transactions: Install sysfsutils and
echo „block/sdX/queue/scheduler = deadline“ >> /etc/sysfs.conf
(adjust sdX to match your SSD) reboot or
echo deadline > /sys/block/sdX/queue/scheduler
In systems with different drive types you can adjust settings with audevrule (create /etc/udev/rules.d/60-ssd-scheduler.rules):
# set deadline scheduler for non-rotating disks ACTION=="add|change", KERNEL=="sd[a-z]", ATTR{queue/rotational}=="0", ATTR{queue/scheduler}="deadline"To check if the kernel knows about SSDs try:
# for f in /sys/block/sd?/queue/rotational; do printf "$f is "; cat $f; done /sys/block/sda/queue/rotational is 1 /sys/block/sdb/queue/rotational is 1 /sys/block/sdc/queue/rotational is 0 <=== Only this is SSD!
$ grep . /sys/block/sd?/queue/rotational /sys/block/sda/queue/rotational:1 /sys/block/sdb/queue/rotational:1 /sys/block/sdc/queue/rotational:0 <=== Only this is SSD!
To switch scheduler manually issue:
# echo deadline > /sys/block/$YOURDRIVE/queue/scheduler
To see results:
# for f in /sys/block/sd?/queue/scheduler; do printf "$f is "; cat $f; done /sys/block/sda/queue/scheduler is noop deadline [cfq] /sys/block/sdb/queue/scheduler is noop deadline [cfq] /sys/block/sdc/queue/scheduler is noop [deadline] cfq <== That is!
$ grep . /sys/block/sd?/queue/scheduler /sys/block/sda/queue/scheduler:noop deadline [cfq] /sys/block/sdb/queue/scheduler:noop deadline [cfq] /sys/block/sdc/queue/scheduler:noop [deadline] cfq <== That is!
The dumb „noop“ scheduler may be a little faster in benchmarks that max out the throughput, but this scheduler causes noticeable delays for other tasks while large file transfers are in progress.
/etc/fstab example
Here is an example of /etc/fstab
# /etc/fstab: static file system information. # # Use 'vol_id --uuid' to print the universally unique identifier for a # device; this may be used with UUID= as a more robust way to name devices # that works even if disks are added and removed. See fstab(5). # # ### SSD: discard,noatime ### match battery operation default for commit JOURNAL_COMMIT_TIME_AC in Add files in /etc/pm/config.d/* /dev/mapper/goofy-root / ext4 discard,noatime,commit=600,errors=remount-ro 0 1 # /boot was on /dev/sda1 during installation UUID=709cbe4a-80c1-46cb-8bb1-dbce3059d1f7 /boot ext4 discard,noatime,commit=600,defaults 0 2 ### SSD: discard /dev/mapper/goofy-swap none swap sw,discard 0 0 /dev/mapper/goofy-chroot /srv/chroot btrfs ssd,discard,noatime 0 2 /dev/scd0 /media/cdrom0 udf,iso9660 user,noauto 0 0
/etc/lvm/lvm.conf example
... # This section allows you to configure which block devices should # be used by the LVM system. devices { ... # Issue discards to a logical volumes's underlying physical volume(s) when # the logical volume is no longer using the physical volumes' space (e.g. # lvremove, lvreduce, etc). Discards inform the storage that a region is # no longer in use. Storage that supports discards advertise the protocol # specific way discards should be issued by the kernel (TRIM, UNMAP, or # WRITE SAME with UNMAP bit set). Not all storage will support or benefit # from discards but SSDs and thinly provisioned LUNs generally do. If set # to 1, discards will only be issued if both the storage and kernel provide # support. # 1 enables; 0 disables. #issue_discards = 0 issue_discards = 1 } ...Smaller system with SSD
See
Adding vm.swappiness in sysctl for the kernel
As perhttp://evolvisforge.blog.tarent.de/archives/68which has come on p.d.o. as well as on 29/07/2013 the following needs to be added in /etc/sysctl.conf.d/ for better longevity of the disc:
# /etc/sysctl.d/local.conf #vm.swappiness=0 vm.swappiness=1
Setting vm.swappiness=0 is more aggressive but may cause out-of-memory events.http://java.dzone.com/articles/OOM-relation-to-swappiness
Note:together with other settings vm.swappiness =may be a considerable enhancement to I/O performance; worth reading:http://rudd-o.com/linux-and-free-software/tales-from-responsivenessland-why-linux-feels-slow-and-how-to-fix-that
reduce swapping activities with ZRam
UsingZRam(aka compcache) it is possible to use data compression on the contents of the system memory (RAM). This effectively trades in some CPU cycles for the ability to stuff a lot more into the available system memory and thereby reduces the need for swapping out memory pages to the SSD. It uses specialised high speed data compression algorithms that are especially light on the CPU and yet are said to give typically about 1:3 compression on this type of content. Because compressing is typically faster than writing to swap devices it also brings performance improvements to systems without excessive amounts of physical memory. It is available starting with version 3.2 of the Linux kernel. See the respective article on how to activate it, if you have a matching kernel version.
Upgrading the Firmware
Some problems might occur due to firmware bugs. Therefore, use tools likesmartctl(terminal) orGSmartControl(GUI) to check for warnings to update the firmware.Normally the manufacturer provides these proprietary firmware images packed within update tools, available as bootable CD ISO images.
In case they used FreeDOS started by syslinux, instead of booting from CD, you can extract the (floppy) image inside the ISO and create a new entry in your GRUB2 boot menu.
For the Crucial m4 firmware update, thesyslinux.cfglooks like this:
LABEL default KERNEL memdisk append initrd=boot2880.img floppy raw
Copying the filesmemdiskandboot2880.imgto the boot partition allows them to be started from GRUB2, by adding an entry in/etc/grub.d/40_custom:
# assuming an ext2 boot partition on (hd0,5) -- compare to your other GRUB2 entries menuentry "m4 firmware update" { insmod ext2 linux16 (hd0,5)/isos/m4memdisk floppy raw initrd16 (hd0,5)/isos/boot2880.img }Afterwards runupdate-grubto apply the changes. Reboot and select the created boot entry, then follow the firmware update menu. After completion, restart the computer.
SSD related bug reports
This is a list of SSD related bug reports. It is probably better to come up with a user tag to use instead of listing them all here.
https://wiki.debian.org/SSDOptimization
41. Instalace TrueCrypt:
sudo add-apt-repository ppa:stefansundin/truecrypt sudo apt-get update sudo apt-get install truecryptyou can also right-click the file and click on execute to do the same job from GUI
or from terminal „cd“ your way to the file location and use „./“ then file name to execute it.
./truecrypt-7.1a-setup-x86Install TrueCrypt with AppIndicator instead of tray icon in Ubuntu
sudo add-apt-repository ppa:stefansundin/truecrypt
 sudo apt-get update && sudo apt-get install truecrypt


After Installing Ubuntu 14.04 Trusty Tahr, there are a wealth of things that need to be dealt with, including Hardware Drivers, DVD, Audio and Video Codecs, Archiving formats, generally useful stuff.
These instructions presume you are proficient with PPAs, .Debs, and other terminal commands, Ubuntu Tweak, and require a full set of video, audio, and archive codecs, as well as Skype, Flash, and a truck-load of wallpapers.
Warning
Using the sudo command can result in severe system damage. Read all instructions and confirm you understand before executing any commands.
Make sure you type commands correctly, or copy and paste the entire code. Your first click will highlight all the code, or you can double click in the code area to do it again.
1. Enable Partner Repositories
The partner repositories are another source of software, but for those with restrictive licenses that mean the general public cannot simply share them, such as Flash and Skype. These are official repo’s that are already added but disabled in Ubuntu. This command enables them.

2. Download and Install GetDeb and PlayDeb
Both GetDeb and PlayDeb are repositories, sources of updates for actual software you have or will have installed. They are useful for getting more up-to-date versions than those that ship in the official Ubuntu repositories, which programmers can find difficult to update as they encounter red tape. They may also contain less popular software which is not listed in the official repo’s.
While this may look like an awful lot of code for something that should be relatively simple, you should know that while GetDeb and PlayDeb are repositories, they’re not launchpad hosted, and hence a little more difficult to add.
3. Add Personal Package Archives
Personal Package Archives, or PPAs, are yet more sources of updates and new and exciting software. These are some of the most popular, useful, and reliable sources for some default software and some more things we’ll install later.
Updates to the latest version of VLC, the popular media player that many people believe should be installed by default.
GIMP is an image editor akin to Adobe Photoshop, except free. It is included in many open-source systems, and it would be a crime to use a version old enough not to have single window mode.
While we won’t be installing the full GNOME desktop environment, they do make many of the packages that are already installed on your system, and they can be updated from here.
Another WebUpd8 PPA, this time a masterfully crafted Java package. It hosts Java 8Beta (not yet stable), Java 6 (an old version) and, most importantly, Java 7 (which we will install later).
This PPA (WebUpd8 again), hosts the program Y PPA Manager. That’s right, we’re adding a PPA so we can add PPAs. But that’s not all it does, it can also remove, purge, check for duplicates and remove broken ones.
LibDVDCSS is a library required for reading some DVDs. Unfortunately, due to legal issues, it is not included by default. This repository is provided by Videolan, and requires a bit more code to add.
4. Check for Updates
Now that we’ve added all those new sources, you’re going to need to check for updates, even if they’ve already popped up of their own accord.
5. Upgrade Packages
Now that we’ve finished adding places to get updates from and secured them, it’s time to update what you already have.
6. Major Upgrades
Some updates are bigger than others. This command is for the huge ones.
7. Install Essentials
Now we’re going to install all the things we thing the average user will need to not encounter any problems playing Music or Videos, watching DVDs, going on YouTube or extracting archives.
Below you can find a breakdown of what each package does. This is the step that most frequently goes wrong and you should read what your terminal prints out before confirming. You may end up removing something you don’t want to if there is a conflict.
Installing libdvdcss
Legal warning: Check with your local laws to make sure usage of libdvdcss2 would be legal in your area.
Ubuntu 12.04, 12.10, 13.04, 13.10, 14.04 (i386, amd64)
May also work for old releases, 9.04 onwards, that are no longer supported only if you have repositories on Cd/Dvd or somewhere.
The current LTS, 12.04 onward work this way.
Install the libdvdread4 package (no need to add third party repositories) via Synaptic or command line: (note: if you have installed *ubuntu-restricted-extras this has already been installed automatically for you)
sudo apt-get install libdvdread4
- Then open a terminal window and execute:
sudo /usr/share/doc/libdvdread4/install-css.sh
- Rebooting may be necessary.
After this, VLC will automatically use it. Some programs may need recompilation.
If after doing all this, you still get messages about not being able to play DVDs, check that the DVD drive has a region set (see below).
Setting DVD Region Codes
If your DVD player regularly locks up when you try to play back a DVD, your DVD player probably does not match the DVD’s region code. Region codes are a form of vendor lock-in. For example, you cannot play a DVD published in Japan (Region 2) on a DVD player in the United States (Region 1) without changing the region code of the DVD player (unless you own a region-free DVD player). You can view or modify the region code of your DVD drive with the regionset tool.
|

The author of regionset writes: „On delivery, most DVD drives have no region code set. The drive firmware allows you to change the region code, but on nearly all drives you are limited to five (5) changes. After the fifth change, the DVD drive will stay fixed on that code — on some drives you can upgrade the drive firmware and have then additional five changes, on other drives you won’t be able to change the region code any more.“
- Most players (e.g. MPlayer/VLC) with most DVD drives are able to ignore the value of the region setting. However, it must be set to something; if it hasn’t been initialized, even non-region-restricted DVDs won’t play. Also, if it is necessary to crack the CSS key, it can sometimes take up to a few minutes to do so.
- To change the region code of your DVD player, insert a DVD from your region in the DVD player, and do the following:
Install the regionset package from the Universe repositories.
- To launch regionset, issue the command
sudo regionset /dev/X (e.g. /dev/sr0)
See the Free Formats page for more information
Index of /libdvdcss/1.2.10/deb/
http://download.videolan.org/libdvdcss/1.2.10/deb/
../ libdvdcss2-dev_1.2.10-1_amd64.deb 29-Aug-2008 20:40 20454 libdvdcss2-dev_1.2.10-1_i386.deb 29-Aug-2008 20:42 18798 libdvdcss2_1.2.10-1_amd64.deb 29-Aug-2008 20:40 117890 libdvdcss2_1.2.10-1_i386.deb 29-Aug-2008 20:42 116908 libdvdcss_1.2.10-1.diff.gz 29-Aug-2008 20:40 2773 libdvdcss_1.2.10-1.dsc 29-Aug-2008 20:40 397 libdvdcss_1.2.10.orig.tar.gz 29-Aug-2008 20:40 420996
10 Awesome Indicator Applets for Ubuntu’s Unity Desktop

If you’ve used Ubuntu a while, you might remember GNOME applets – icons that sat on your panel and gave you access to controls and information. If you miss panel applets, try installing third-party indicator applets for Ubuntu’s Unity desktop.
There are a wide variety of indicator applets available for Unity, most of which aren’t available in Ubuntu’s default software repositories. The commands to install the indicator applets provided here were tested on Ubuntu 12.04.
After installing an indicator, you may have to search for it and activate it from your Dash, launch it with a command, or log out and log back in. This behavior depends on the indicator.
Weather
The weather indicator applet provides constantly updating weather information right on your panel. Install it with the following command:
sudo apt-get install indicator-weather
Launch the Weather indicator from the Dash after installing it.

System Load / Performance
The system load indicator shows you graphs of your system performance on your panel – like the old GNOME System Monitor applet used to. It shows a graph of your CPU activity by default, but it can show graphs for more than one type of resource at a time – from its preferences, you can enable graphs for network activity, memory, and other system resources.
sudo apt-get install indicator-multiload
Launch this indicator from the Dash after installation.

CPU Frequency
The CPU frequency scaling indicator shows you the current speed of your CPU and lets you control its policy – for example, you can force a certain CPU speed, enable power-saving mode, or enable high-performance mode.
sudo apt-get install indicator-cpufreq
Launch the indicator by running the following command after installing it:
indicator-cpufreq

Ubuntu One
If you use Ubuntu One, you might want an indicator applet that shows you Ubuntu One’s status – including your current file transfers and available space – without having to open Ubuntu One’s configuration window. The unofficial Ubuntu One indicator provides this information. Install it with the following commands:
sudo add-apt-repository ppa:rye/ubuntuone-extras
sudo apt-get update
sudo apt-get install indicator-ubuntuone
Log out and log back in. The indicator will automatically start.

Classic Menu
The classic menu indicator provides a classic, GNOME 2-style menu on your panel in Unity. Install it with the following commands:
sudo apt-add-repository ppa:diesch/testing
sudo apt-get update
sudo apt-get install classicmenu-indicator
Launch ClassicMenu Indicator from the Dash after installing it.

Recent Notifications
The recent notifications indicator provides a list of recent notifications that Ubuntu has shown to you – anything that came through the notification daemon appears here. You’ll be able to view all your recent notifications, even if you were away from your computer when they appeared.
sudo add-apt-repository ppa:jconti/recent-notifications
sudo apt-get update
sudo apt-get install indicator-notifications
Log out and log back in. The indicator will automatically appear.

Touchpad
The touchpad indicator allows you to easily disable and enable your laptop’s touchpad — right from the panel. Run the following commands to install it:
sudo add-apt-repository ppa:atareao/atareao
sudo apt-get update
sudo apt-get install touchpad-indicator
After installing the indicator, launch it from your Dash.

Hardware Sensors
The hardware sensors indicator shows you information from your system’s hardware sensors, such as the temperatures of your system’s hardware and the speed of its fans. Install it with the following commands:
sudo add-apt-repository ppa:alexmurray/indicator-sensors
sudo apt-get update
sudo apt-get install indicator-sensors
Launch the indicator from the Dash after installing it.

Caffeine
The caffeine indicator allows you to prevent Ubuntu from going to sleep. For example, this may be useful if you’re watching videos in an application that doesn’t automatically inhibit Ubuntu’s sleep behavior. Use the following commands to install it:
sudo add-apt-repository ppa:caffeine-developers/ppa
sudo apt-get update
sudo apt-get install caffeine
Launch Caffeine from the Dash after installing it.

Keylock
The keylock indicator applet shows you whether your caps lock, num lock, or scroll lock keys are on. Use these commands to install it:
sudo add-apt-repository ppa:tsbarnes/indicator-keylock
sudo apt-get update
sudo apt-get install indicator-keylock
Launch Indicator-Lockkeys from the dash after installing it.

Do you use another useful indicator applet? Leave a comment and let us know about it.
Useful Panel Indicators Collection For Ubuntu 14.04 Trusty Tahr
Panel indicators are very handy when it comes to access bold features of application or any standalone indicator which offers various functionality for the desktop to make user experience better. This time I tried to gather all available indicators for 14.04 LTS in one place, so you guys don’t have to explore the internet for specific indicator and you can also tell me if I missed any indicator here(Just drop me a line via contact page, I will try to include in the post, if possible).
If you are using Ubuntu 12.04 then you have to checkout this indicators collection post for Ubuntu 12.04 Precise. You can install these indicators in other desktop like Gnome-Classic, Mate, Cinnamon, Xfce and others but I can’t say that every indicator will show up in every desktop, so I tested these indicators under Unity desktop. I didn’t check these indicators on Linux Mint, hopefully they shall work with Linux Mint 17 without any problem.
1: Feed Indicator
Feed indicator can show RSS feed updates in the Panel via its indicator. I added this indicator to our PPA but there is no latest update from developer side since 2012, it works without any problem, hope to see new release in future with more features.

To install feed indicator in Ubuntu 14.04 Trusty/Linux Mint open Terminal (Press Ctrl+Alt+T) and copy the following commands in the Terminal:
2: HackerTray Indicator
HackerTray is a simple Hacker News Linux application that lets you view top HN stories in your System Tray. It open links in your default browser and remembers which links you’ve visited. It relies on appindicator, so it is not guaranteed to work on all systems. It also provides a Gtk StatusIcon fallback in case AppIndicator is not available.

To install HackerTray indicator in Ubuntu 14.04 Trusty/Linux Mint open Terminal (Press Ctrl+Alt+T) and copy the following commands in the Terminal:
After installation open terminal and run indicator with this command „hackertray &“ without quotes.
3: Reminder Indicator
Remindor indicator is an indicator app specially designed for Ubuntu to set schedule reminders. These reminders can be configured to play a sound, show a notification, and/or run a command. Indicator Reminder has a powerful date/time selection feature that allows you to express recurring dates/times in plain English. For example: „every day“, „every Monday“, „every other“, „every weekday“, „every 30 minutes“, and more!. They can also be set to repeat minutely or hourly.

To install Reminder indicator in Ubuntu 14.04 Trusty/Linux Mint open Terminal (Press Ctrl+Alt+T) and copy the following commands in the Terminal:
or install QT version of Remindor indicator via following commands in Ubuntu 14.04 Trusty:
4: Keylock Indicator
Indicator keylock is very useful utility, if your laptop/keyboard doesn’t have leds to indicate that Num/Caps/Scroll keys are turned on/off. It shows notification on/off whenever Num/Caps/Scroll keys pressed and it allows indicator to choose icon between Num/Caps/Scroll to show in indicator panel. So with this utility a user can quickly see if Num lock, Caps lock or Scroll lock is turned on/off. After installation start indicator keylock from dash/menu, first time it doesn’t show indicator in panel but works perfectly then you need to press any lock key and indicator will popup in panel then go to preferences and select option ‚show indicator while lock key is inactive‘.

To install Keylock indicator in Ubuntu/Linux Mint open Terminal (Press Ctrl+Alt+T) and copy the following commands in the Terminal:
5: Synapse Indicator
Indicator Synapse, a search indicator made by Tom Beckmann for elementary OS. The indicator is similar to Mac OS Spotlight. It creates virtual index of files and items which are on the system. It is designed to access files and items quickly. It also has ability to search in online dictionary/knowledge engine (WolframAlpha) and web.
To install Synapse indicator in Ubuntu/Linux Mint open Terminal (Press Ctrl+Alt+T) and copy the following commands in the Terminal:
6: Caffeine Indicator
Caffeine indicator allows user to temporary disable screensaver/sleep mode, Also there is option to add program in list to disable screensaver permanently for that program.

To install Caffeine indicator in Ubuntu/Linux Mint open Terminal (Press Ctrl+Alt+T) and copy the following commands in the Terminal:
7: Tomboy Notes Indicator
Tomboy is a desktop note-taking application which is simple and easy to use. It lets you organise your notes intelligently by allowing you to easily link ideas together with Wiki style interconnects.

To install Tomboy Notes indicator in Ubuntu/Linux Mint open Terminal (Press Ctrl+Alt+T) and copy the following commands in the Terminal:
8: Crypt-folder Indicator
With Crypt-Folder you can manage EncFS folders via this indicator, You can mount, unmount EncFS folders, create new EncFS folders, stores the password in Gnome Key-ring and mounts it at login, change existing EncFS folders password.

To install Cryptfolder indicator in Ubuntu/Linux Mint open Terminal (Press Ctrl+Alt+T) and copy the following commands in the Terminal:
9: Windows-List Indicator
Window-list is an application indicator to display a list of all current open windows via indicator. Each window can be activated by selecting from the list.

To install Window-List indicator in Ubuntu/Linux Mint open Terminal (Press Ctrl+Alt+T) and copy the following commands in the Terminal:
10: Brightness Indicator
Brightness indicator allows you to control your laptop display brightness with indicator.
Features:
– Clicking the icon shows you all the possible brightness values, to a maximum of 15 steps.
– The current value is indicated with a dot.
– Clicking a menu item sets the brightness to the desired value.
– Scroll wheel event is enabled on the icon. Scrolling up means higher brightness, scrolling down lower.
– Control screen brightness with custom keyboard shortcuts.
To install Brightness indicator in Ubuntu/Linux Mint open Terminal (Press Ctrl+Alt+T) and copy the following commands in the Terminal:
11: Diodon Indicator
Diodon is a lightweight clipboard manager for Linux written in Vala which „aims to be the best integrated clipboard manager for the Gnome/Unity desktop“.
Diodon features include Ubuntu indicator, clipboard sync (primary selection and Ctrl+C / Ctrl+V clipboard) and an option to set the clipboard size.

To install Diodon indicator in Ubuntu/Linux Mint open Terminal (Press Ctrl+Alt+T) and copy the following commands in the Terminal:
12: Recent Notification Indicator
The Recent Notifications applet displays the recent NotifyOSD notifications and allows you copy the text or a link from a notification. You can also click on a link to open it. There are options to blacklist applications within the applet to hide the associated notifications and set the time limit to show a message.

To install Recent Notification in Ubuntu/Linux Mint open Terminal (Press Ctrl+Alt+T) and copy the following commands in the Terminal:
Logout and Login back to get it work
13: Calendar Indicator
Calendar indicator is linked with Google Calendar, You can access your Google account calendar via this indicator and get notifications directly on your desktop.

To install Calendar indicator in Ubuntu/Linux Mint open Terminal (Press Ctrl+Alt+T) and copy the following commands in the Terminal:
14: Classic Menu Indicator
ClassicMenu Indicator is a notification area applet (application indicator) for the top panel of Ubuntu’s Unity desktop environment. It provides a simple way to get a classic GNOME-style application menu for those who prefer this over the Unity dash menu. Like the classic GNOME menu, it includes Wine games and applications if you have those installed.

To install ClassicMenu-indicator in Ubuntu/Linux Mint open Terminal (Press Ctrl+Alt+T) and copy the following commands in the Terminal:
15: Copyq Indicator
CopyQ is advanced clipboard manager with searchable and editable history with support for image formats, command line control and more. Command interface and graphical interface accessible from tray. By default the application stores any new clipboard content in list in the first tab. Main window can be opened by either left clicking on tray icon, running command copyq show or using system-wide shortcut (configurable from Preferences).

To install Copyq in Ubuntu/Linux Mint open Terminal (Press Ctrl+Alt+T) and copy the following commands in the Terminal:
16: FluxGui Indicator
F.luxGui indicator applet is an indicator applet to control xflux, an application that makes the color of your computer’s display adapt to the time of day, warm at nights and like sunlight during the day

To install FluxGui-indicator in Ubuntu/Linux Mint open Terminal (Press Ctrl+Alt+T) and copy the following commands in the Terminal:
17: Sticky Notes Indicator
Indicator Sticky Notes is use to note important tasks, to-do things for remember to do in time. Sticky Notes just stick to desktop with user convenience. StickyNotes offers to make notes with any background color and with text color, just create a new category from settings and choose it.

To install StickyNotes-indicator in Ubuntu/Linux Mint open Terminal (Press Ctrl+Alt+T) and copy the following commands in the Terminal:
18: Touchpad Indicator
With Touchpad indicator you can enable/disable your laptop touchpad.

To install Touchpad-indicator in Ubuntu/Linux Mint open Terminal (Press Ctrl+Alt+T) and copy the following commands in the Terminal:
19: System Monitor Indicator
System Monitor display CPU and memory usage on panel, Also you can access system monitor from this indicator.

To install SysMonitor-indicator in Ubuntu/Linux Mint open Terminal (Press Ctrl+Alt+T) and copy the following commands in the Terminal:
20: Multi-Load Indicator
Multi-Load indicator displays information about your system resources.

To install MultiLoad-indicator in Ubuntu/Linux Mint open Terminal (Press Ctrl+Alt+T) and copy the following commands in the Terminal:
21: Sensors Indicator
Sensors Indicators display your PC sensors information. In order to use this indicator, your PC must have sensors. Hardware sensors indicator for Unity to display and monitor the readings from various hardware sensors (temperature, fan speeds, voltages etc).
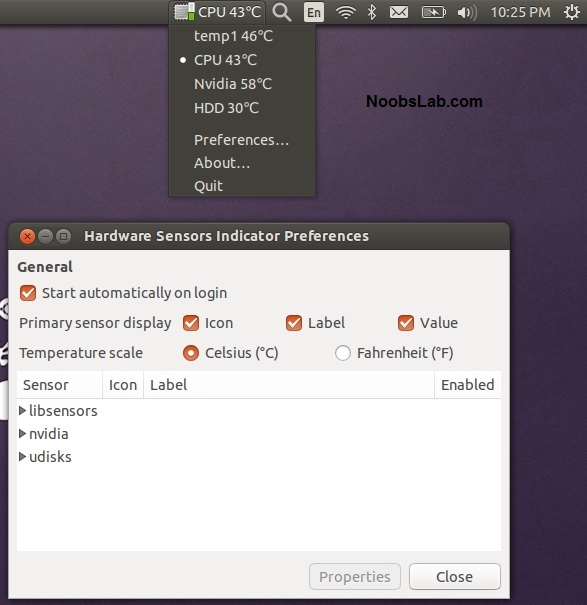
To install Sensors indicator in Ubuntu/Linux Mint open Terminal (Press Ctrl+Alt+T) and copy the following commands in the Terminal:
22: CpuFreq Indicator
CpuFreq indicator applet for displaying and changing CPU frequency on-the-fly. It provides the same functionality as the Gnome CPU frequency applet, but doesn’t require Gnome panel and works under Unity.
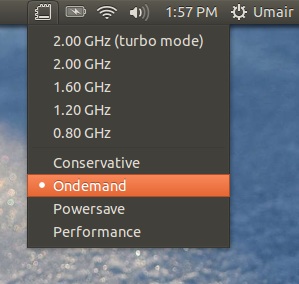
To install CpuFreq indicator in Ubuntu/Linux Mint open Terminal (Press Ctrl+Alt+T) and copy the following commands in the Terminal:
23: Psensor Indicator
Psensor application Indicator is providing a quick access to sensor values and settings. When a sensor temperature is too much hot, a desktop notification bubble appears and the Application Indicator icon is changed to a red one.
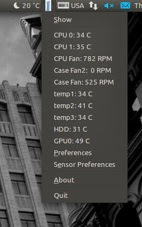
To install Psensor indicator in Ubuntu/Linux Mint open Terminal (Press Ctrl+Alt+T) and copy the following commands in the Terminal:
24: My-Weather Indicator
My-Weather indicator is an application especially designed for Ubuntu, you will be informed of current weather and the weather forecast. Integrated with the Ubuntu desktop via an indicator.

To install My-Weather-indicator in Ubuntu/Linux Mint open Terminal (Press Ctrl+Alt+T) and copy the following commands in the Terminal:
25: Indicator Weather
A fully featured weather notification applet for use on the GNOME panel. Current weather status is displayed directly on your panel and detailed forecasts are no more than a click away. Implemented using the Indicator Applet API.

To install Indicator Weather in Ubuntu/Linux Mint open Terminal (Press Ctrl+Alt+T) and copy the following commands in the Terminal:
26: Google Tasks Indicator
Google Tasks indicator shows most recent Google tasks from our account on the Panel.

To install Google Tasks Indicator in Ubuntu/Linux Mint open Terminal (Press Ctrl+Alt+T) and copy the following commands in the Terminal:
27: Fortune Indicator
Fortune indicator shows fortune cookies by OSD notifies, it calls the fortune program and shows the result in the on-screen notification.

To install Fortune Indicator in Ubuntu/Linux Mint open Terminal (Press Ctrl+Alt+T) and copy the following commands in the Terminal:
28: Lunar Indicator
Lunar indicator shows the moon phase, moon/sun/planet/star/satellite ephemeris and other astronomical information.

To install Lunar Indicator in Ubuntu/Linux Mint open Terminal (Press Ctrl+Alt+T) and copy the following commands in the Terminal:
29: StarDate Indicator
This indicator shows the current Star Trek stardate.

To install Stardate Indicator in Ubuntu/Linux Mint open Terminal (Press Ctrl+Alt+T) and copy the following commands in the Terminal:
30: Virtualbox Indicator
VirtualBox indicator is a simple yet very useful appindicator which you can use to launch VirtualBox machines without opening VirtualBox. It works with both VirtualBox and VirtualBox-OSE.

To install Virtualbox Indicator in Ubuntu/Linux Mint open Terminal (Press Ctrl+Alt+T) and copy the following commands in the Terminal:
31: Privacy Indicator
Privacy Indicator is a notification area applet (application indicator) for the top panel of Ubuntu’s Unity desktop environment.

To install Privacy Indicator in Ubuntu/Linux Mint open Terminal (Press Ctrl+Alt+T) and copy the following commands in the Terminal:
32: Sound Switcher Indicator
Sound input/output selector indicator for Ubuntu/Unity. It shows an icon in the indicator area in Ubuntu’s Panel. Icon’s menu allows you to switch the current sound input and output ports with just two clicks.

To install Sound Switcher Indicator in Ubuntu/Linux Mint open Terminal (Press Ctrl+Alt+T) and copy the following commands in the Terminal:
33: Pomodoro Technique Indicator
An indicator for working with Pomodoro Technique With Pomodoro-Indicator you have a tool to work with the Pomodoro Technique. This is a simple indicator that helps keep concentrated. You start it before a complicated problem and you have to keep concentrated for at least 10 minutes after it becomes green you can continue to work on your problem but you get thing done.

To install Pomodoro Technique Indicator in Ubuntu/Linux Mint open Terminal (Press Ctrl+Alt+T) and copy the following commands in the Terminal:
34: PushBullet Indicator
An indicator for working with PushBullet With PushBullet-Indicator you can send addresses, files, links, lists, and notes to the configurated devices on PushBullet.

To install PushBullet Indicator in Ubuntu/Linux Mint open Terminal (Press Ctrl+Alt+T) and copy the following commands in the Terminal:
35: Truecrypt Indicator
Free open-source disk encryption software TrueCrypt is a software system for establishing and maintaining an on-the-fly-encrypted volume (data storage device). On-the-fly encryption means that data are automatically encrypted or decrypted right before they are loaded or saved, without any user intervention. No data stored on an encrypted volume can be read (decrypted) without using the correct password/keyfile(s) or correct encryption keys. Entire file systems can be encrypted. This package replaces the standard tray icon with a unity indicator.

To install Truecrypt Indicator in Ubuntu/Linux Mint open Terminal (Press Ctrl+Alt+T) and copy the following commands in the Terminal:
36: StackApplet Indicator
Applet to display your reputation on StackExchange sites. StackApplet is a small applet that monitors your activity on any StackExchange site. StackApplet has recently been rewritten to take advantage of the new AppIndicator framework, with a fallback for older systems that do not have the module installed. StackApplet will notify you when your reputation changes, when someone posts a comment to you, or when one of your questions is answered.

To install StackApplet Indicator in Ubuntu/Linux Mint open Terminal (Press Ctrl+Alt+T) and copy the following commands in the Terminal:
37: Places Indicator
Places is a simple indicator that shows common folders and all bookmarks, the indicator updates automatically if bookmark was added or removed.

To install Places Indicator in Ubuntu/Linux Mint open Terminal (Press Ctrl+Alt+T) and copy the following commands in the Terminal:
That’s it